Pages

Tuesday, April 28, 2020

KiCad (PCB Layout)

In this tutorial, we will continue the previous tutorial where we were discussed about how to design a schematic of the circuit.
1. Open kicad and then go to tools> run pcbnew. You will find a new black coloured window which is nothing but a PCB editor or layout editor tool. Now we have to read the netlist which we were created in the previous tutorial, for importing the components in this PCB layout designer. So go to tools and then click on netlist a small window will open in which you have to click on read button after that close the window. In the PCB editor window, you will find the whole components that we were used in the previous tutorial or footprint that we have assigned to our components in the previous tutorial.


2. Now we have to arrange all the components according to our board size or need. You will find that all components are connected to each other by threads. These threads are generated by kicad to show the connections which we created in schematic designing part. Here we can use some keyboard shortcut like if you want to move any text or footprint then simply hover the mouse on it and press "M" now you can move component easily. If you want to edit its properties then simply press ‘E’ and for rotate press ’R’.


3. Now after arranging all components start tracing with the help of track and via tool which you will find the right side of the window and also you can select working layer like front copper or back copper from the toolbar as shown in the below image. Remember you can’t place track between two terminals which are not connected by a thread to each other. While tracing the tracks if you want to change the working layer then simply press ‘v’ it instantly switches the tracing layer and if you press again then it returns to previous working layer. This is very helpful when you are going to place a jumper or if you are unable to find out the clearance for your track.


4. If you want to change the default track width then you have to go design rules>design rules and you will find here various settings like track width, via dia, clearance, etc. you can change them according to your PCB needs. Using design rules you can also set up the working layers like your PCB is going to use 2 layers or more.


5. After tracing is done now we have to define the outer edge of the PCB. This step is very important because it will provide the dimension of the PCB as well as it is also necessary for generating the 3D view of PCB. For that select Edge Cuts from the right sidebar (Layers) where you selected the PCB working layer and select pointer as "graphical line and polygons" as shown in the below image. Now simply draw the rectangle which encloses your components, remember don’t draw the line over track and also don’t leave too much space otherwise your PCB will look bulky and not optimized.


6. After enclosing a few things are remaining before we can jump to the Gerber file generating step. If you want to fill the unused space by copper you have to use the tool ‘add filled zones’. For adding simply select the pointer from the right side as shown in the image then draw a rectangle which encloses your entire PCB (including edge cuts mark). When you start drawing rectangle a small window will open which asks you to select the layer and a pad which is going to be sorted with fill zone, commonly ground pad is preferred. After that hover your mouse on the rectangle and click right button then select fill zone, you will get the layout as shown in the below image.


Similarly, you can also add a fill zone to another side layer.


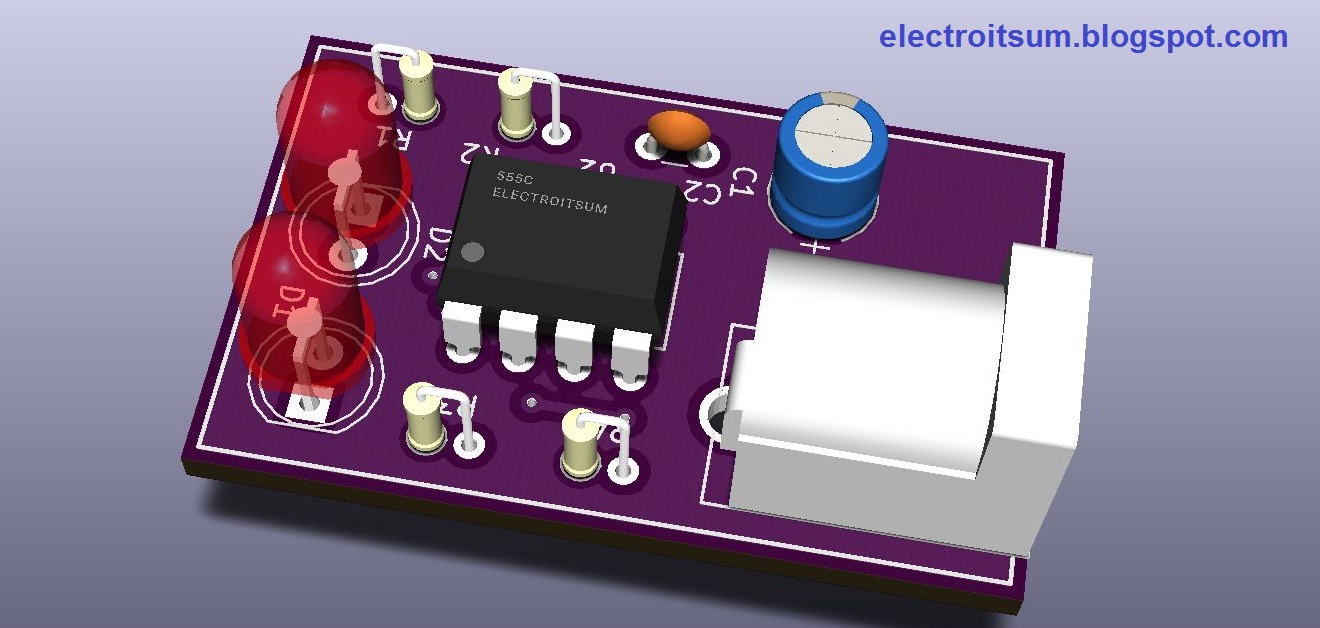
7. After the all above operations now, you can see 3D view of your PCB and for that go to view and then 3D viewer.

Gerber File:
1. Gerber is very important file because using this file you can order your PCB to any PCB manufacturing company. For generating these files we are going to use plot tool and for that go to file>plot. In plot window select type as Gerber as shown in the below image. Now select all the layers for which you want to generate Gerber file like if your PCB uses 2 layers F.Cu. and B.Cu. then select these layers. Also select the layer like front silk and back silk if you have used. Now click on plot that will generate Gerber file for layers, but not for drill.


2. For generating drill file click on the "generate drill file" and after that select the drill file format as Gerber then click on "drill file" and "map file" which will generate their respective files. These files can be found in their respective project directory.


OUTPUT 3D:


 In the next tutorials, we will learn how to create own custom schematic symbol.
----------------------------------------------------------------------------------------------------------------------------------------------
You may also like:-

Arduino with GLCD

IoT with ESP8266

Saturday, April 25, 2020

Smoke detection using AT89C51


Hello guys, hope you are here because you want to make something or gain some electronics knowledge so let’s start DIY-
In this DIY session, we will discuss about the smoke detector using one of the simplest microcontrollers, 8051 which is made by Atmel Company. In this DIY project you need the following things –
  • 16X2 LCD Display
  • 10K pot
  • 10k Resistor
  • 8.2k resistor
  • Push-button
  • Buzzer
  • 11.0592 MHz Crystal Oscillator
  • 22pf capacitor – 2
  • 5v power supply
1. AT89CXX:

This is one of the simplest microcontrollers which can be used for small projects. 8051 series microcontrollers came into existence early 90s and first was made by the Intel Company. It has various functions like, it has built-in UART for serial communication, two types of interrupt hardware and software, RAM, ROM, an oscillator circuit, 16-bit timer, etc. This microcontroller has four 8bit general-purpose I/O port.


2. MQ5:

MQ5 is a smoke detector sensor which can be used for smoke, carbon monoxide as well as flammable gas detection. There are various types of sensors available in this “MQ” series and they have different sensing and functionality. You can buy an MQ5 module for this project because it gives calibration facility as well as 2 types of output digital and analog output. Digital output is simply used for the detection purpose whereas analog output used for detection as well as monitoring the level of smoke. Here we are going to use simple digital output because we are not going to measure the level of smoke density. For better understanding find the below image. In the below image, you can see the blue colour variable resistor which is used for the calibration process and you can simply adjust this according to your need like you want to detect very rare or denser smoke. And don’t increase sensitivity too much because it can give our circuit a false trigger.


3. 16X2 LCD:

16X2 is an alphanumeric LCD display which is widely used in embedded systems because it is very easy to interface with any microcontrollers. 16X2 LCD has 2 rows and 16 columns so that you can display 32 characters on display at a time. This display provides various other functionalities like you can on or off the cursor, you can choose cursor type, you can address DDRAM, custom character, read or write, backlight brightness control, etc. In this project, we will use a 10k pot for display backlight control. We will discuss the complete procedure of LCD interfacing in a different tutorial.


4. Power supply:

For 8051 we have to use 5v power supply and if you don’t have then simply connect the 9v battery using voltage regulator ic7805. The circuitry for 7805 is given below. If you are going to use power supply then check its output before connecting to the circuit because high voltage can damage our controller and here we are not going to use any type of high voltage protection.


5. Working:

The working of project and circuit is very simple when the MQ5 sensor detects any smoke or flammable gas it instantly gives a low output at the DO pin. This output is detected by the I/O pin of the microcontroller and then it is processed for further work and manipulation. Remember for mounting the sensor with microcontroller use pull-up resistor for preventing false detection. Here we will show the status of the smoke sensor on the LCD so microcontroller read the status and write its status on LCD. If the status is normal then LCD shows smoke absent and when detected then write smoke detected and turn on the buzzer. Here in the circuit design we used a button (Highlighted in red circle) in the place of the sensor so replace it with the MQ5 sensor. Circuit is shown below.


6. Code:

Here we are using assembly language to code the microcontroller and code is so simple. We continuously monitor the pin P3.7 which is connected to the smoke sensor and gives the low-level output after detecting the smoke. When microcontroller detects the low level on the pin it starts writing a status on the LCD and set 0 the buzzer pin so that buzzer starts beeping. For detecting a single pin status we are going do logical OR operation with port data to 01111111 binary data which gives the two possible outcomes 11111111 or 01111111 and we compare this data to predefined data for the port when we detect smoke or in a simple word we masked the whole bit expect P3.7.  After detecting smoke you have to reset the microcontroller for stopping buzzer and restart the program. The code is given below.


#############################################################################################################################
$mod51
org 00h
MOV P2,#38H
ACALL CMD 
MOV P2,#06H
ACALL CMD
MOV P2,#01H
ACALL CMD
MOV P2,#00FH
ACALL CMD 
ACALL delay
mov P2,#'S'
Acall dat
mov P2,#'M'
Acall dat
mov P2,#'O'
Acall dat
mov P2,#'K'
Acall dat
mov P2,#'E'
Acall dat
mov P2,#' '
Acall dat
mov P2,#'A'
Acall dat
mov P2,#'B'
Acall dat
mov P2,#'S'
Acall dat
mov P2,#'E'
Acall dat
mov P2,#'N'
Acall dat
mov P2,#'T'
Acall dat
loop:
CLR A
MOV A, P3
ORL A, #01111111B
CJNE A, #11111111B, DET
SJMP loop
DET:
MOV P2,#01H
ACALL CMD
mov P2,#'S'
Acall dat
mov P2,#'M'
Acall dat
mov P2,#'O'
Acall dat
mov P2,#'K'
Acall dat
mov P2,#'E'
Acall dat
mov P2,#' '
Acall dat
mov P2,#'D'
Acall dat
mov P2,#'E'
Acall dat
mov P2,#'T'
Acall dat
mov P2,#'E'
Acall dat
mov P2,#'C'
Acall dat
mov P2,#'T'
Acall dat
mov P2,#'E'
Acall dat
mov P2,#'D'
Acall dat
mov P2,#'!'
Acall dat
CLR P3.6
EMR: SJMP EMR
CMD:
CLR P3.0
CLR P3.1
SETB P3.2
ACALL DELAY
CLR P3.2
RET
dat:
SETB P3.0
CLR P3.1
SETB P3.2
ACALL DELAY
CLR P3.2
RET
delay:mov r0,#10
h0:mov r1,#20
h1:mov r2,#20
h2:djnz r2,h2
djnz r1,h1
djnz r0,h0
ret
end

#############################################################################################################################

7. OUTPUT:


#############################################################################################################################

You May Like:-

      - ARDUINO with GLCD
     
          -Know Your Arduino


Friday, April 24, 2020

KiCad (Schematic Designing)


          Kicad is a free software for electronic design automation (EDA). It is an advanced software for designing PCBs and you can design multilayer PCBs free of cost even up to 32 layers and it uses an integrated environment for designing PCB Layouts or schematics. Kicad was developed by Jean-Pierre. This software provides various tools like Bill of Materials, Gerber file ad, 3d prototype viewer, etc. kicad also provides the facility of adding custom components by designing your own schematics and footprint. So without wasting our time let’s start our first tutorial in which we are going to learn how to design your schematics in kicad.


1. Open your kicad software which will look like as below given screenshot. After that go to file and create a new project. you can give project name as you want. At the end of the process, kicad asks you “Do you want to create a new empty directory of the project?” and choose yes, because it is a good practice to put all project files in a specific directory and it also prevents the missing file problems.

2. Now in the PCB designing process, first of all, we have to create a schematics of the project or in a simple language, we have to represent our whole circuit in symbolic form. For that we have to access the schematic editor and we can do it in three ways.
a.      By sidebar
b.      By upper bar
c.      By Tool menu


3. Now double click on filename.sch from sidebar and after that, a new window will open which is known as electronic schematic editor (Eeschema), and here we will draw our schematic circuit. For placing the component choose place component tool from the sidebar as shown in the screenshot.


4. Start placing components after selecting the tool. It will ask you to choose the component which is going to be placed. Select your component as shown in the below screenshot.


5. After placing all components you have to connect them according to the circuit design and for that choose wire tool from the sidebar and then click on the first pin which you want to connect after that click on the next pin where we want to terminate wire connection. Similarly do all connections.


6. After all connections, our schematic design is done now we have to go through some steps for converting this schematic circuit into PCB layout. And for that first of all we have to annotate the schematic and for that go-to tool menu and click on annotate schematic and simply click on annotate (we will discuss options in different tutorials). Annotating is a procedure where we assign a unique name to our used components serial wise like first IC “U1” and second IC as “U2” and so on. Kicad can do all this work by itself using the annotating schematic tool.


7. After annotation, we are ready to assign footprints to our schematic symbols used in our design. In footprint assigning procedure we simply assign the device package type we are going to use in PCB. This step is very important because here you tell to kicad that we are going to use which type of components. For example, let consider you used 555 ic in your schematic but when you are going to create layout then how software treat 555 ic, is it SMD or THT package? And this type of problem is resolved by assigning footprint to schematic symbols.


8. For assigning footprint go-to tools and then assign component footprint. Now here a window will open with a list of used components, click on the component and after that open the footprint library which is situated on the left side of the component list. You will find the all possible footprint at the right side of the component list choose the footprint by double-clicking on it and the system will assign that footprint to the component which you selected. If you want to view how footprint actually looks like then simply select footprint and then click on "view selected footprint" tool as shown in the screenshot. Similarly assign footprint to all components.


9.  After assigning footprint we have to generate netlist and this will be our last step in creating the schematic design. netlist generation is an important step because it generates all the connections that we have done in the schematic circuit for layout design. For generating netlist we will use a netlist generating tool and for that go to tools and then go to generate netlist file after that simply click on generate it will ask you for the place where you want to save netlist file and save it in respective directory. After this save the schematic and we are ready to go for layout design which we will discuss in the next tutorial.


----------------------------------------------------------------------------------------------------------------------------------------------------------

For You!

KiCad (PCB Layout)

I n this tutorial, we will continue the previous tutorial where we were discussed about how to design a schematic of the circuit. 1...